Say Goodbye to Toolpath Marks - Must-Know CNC Toolpath Tips!
📰Weekly Recap Newsletter
11/17/2024
We’re back with another exciting edition of the Learn Your CNC Academy newsletter, packed with everything you need to level up your CNC game. This week, we’re diving into must-know troubleshooting tips, showcasing incredible student projects, and shining the spotlight on our Project Challenge of the Month.
Whether you’re here for step-by-step lessons, practical tips from this week’s Q&A, or just a little inspiration for your next project, we’ve got something for you. So, grab a coffee, pull up a chair, and let’s carve into the week together!
🛠CNC Troubleshooting Corner🛠
This Week's Focus:
Avoiding Ridge Marks in Profile Toolpaths

🤦♂️The Issue:
One of the most common frustrations when carving with a CNC machine is seeing ridge marks left behind, especially when profiling projects. These marks can detract from the final product’s look and require additional sanding or rework.
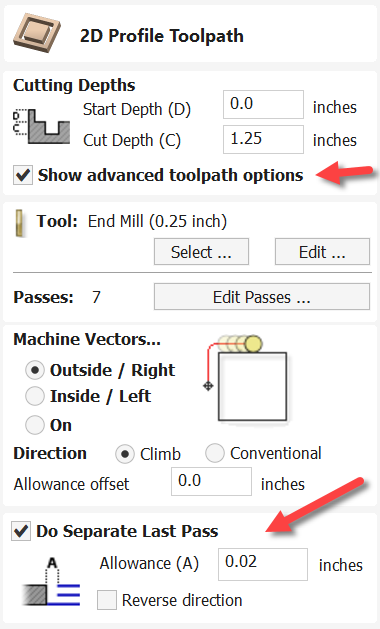
😎The Solution:
A simple fix lies in optimizing your toolpath settings. In Vectric, when using a profile toolpath, enable the "Do Separate Last Pass" option under Advanced Toolpath Options. This allows the machine to make an initial series of cuts slightly away from the final edge before making the last pass right to the line. This technique minimizes material stress and produces a cleaner finish.
Pro Tip:
Practice on scrap material to dial in your settings before moving to the final piece. I recommed using between 0.01" and 0.05" allowance for the "Do Seperate Last Pass" option.
By applying these steps, you’ll save time on cleanup and enjoy smoother, professional-looking results with your CNC projects. Stay tuned for next week’s tip, and happy carving!
This was just one of the many questions we tackled this week in the Learn Your CNC Academy Community. Each week, members bring their challenges, and we provide actionable solutions, tips, and support tailored to help you succeed with your CNC projects.
If you’re not already a member, don’t miss out on the opportunity to grow your skills and connect with like-minded CNC enthusiasts.
Discover more solutions, resources, and exclusive access to live Q&A sessions, project challenges, and a wealth of expert knowledge waiting for you inside.
📖CNC Term of the Week📖
Do Separate Last Pass
The "Do Separate Last Pass" option in Vectric software is a toolpath setting that enables the CNC machine to cut material more precisely during a profile toolpath. It creates an initial series of cuts slightly offset from the final line, followed by a dedicated last pass that cleans up the edge with precision. This setting helps reduce visible marks and ensures a smoother finish on your projects.
How it Works:
When activated, this feature ensures that:
- All initial cuts (or passes) stay slightly away from the final edge.
- The last pass alone trims to the exact line, avoiding cumulative tool deflection and vibration from earlier passes.
- The tool operates more efficiently, creating clean and professional edges with minimal need for sanding.
Pro Tip:
- Set an Appropriate Allowance: Use a small allowance (e.g., 0.01" to 0.05") to balance efficiency and finish quality. A larger allowance may overburden your tool during the final pass, while a smaller one may leave marks.
- Choose the Right Tool: Ensure your cutting tool has flutes long enough to handle the full cutting depth in one pass. If not, switch to a tool with a longer cutting edge.
- Test on Scrap Material First: Every project is unique. Test this setting on scrap material to refine your allowance and confirm tool compatibility before using it on your final piece.
Real-World Example:
In this week’s Q&A, one member shared a common issue with lines appearing on the edges of a carved wooden spoon. Activating the "Do Separate Last Pass" option, combined with using a properly sized bit, resolved the problem, delivering a clean and polished edge.
Why It's Important:
Understanding and applying features like "Do Separate Last Pass" not only improves the quality of your CNC work but also saves time on post-processing, like sanding or additional finishing steps. It’s a game-changer for anyone striving for professional results with their projects.
👇This Week's Highlights👇
Project Lesson of the Week
🎨 Complete your journey through Aspire's advanced modeling toolkit with this final installment of our design icon series! Learn essential techniques for sculpting, drafting, and model manipulation with detailed explanations of Aspire's specialized tools. Master the sculpting brush for custom textures, understand draft angles for stronger designs and better machining, discover model offsetting techniques, and explore hidden modeling features in the menu system. Whether you're creating custom components, optimizing models for machining, or converting toolpath previews into editable 3D models, this lesson provides valuable insights for maximizing Aspire's powerful modeling capabilities.
(Not a member yet? Sign up here to watch the replays and so much more!)
Some Other Project Lessons
that may Interest You
👉VIEW COMPLETE LESSON LIBRARY👈
Vectric Q&A Recap
 |
10-12-2024 Q&A Meetup In this Q&A, we covered topics like reducing visible toolpath lines for smoother finishes, tips on configuring NextWave machines, and sta... academy.learnyourcnc.com |
 |
11-14-2024 Q&A Meetup In this session, we explored advanced techniques in Vectric software, including creating tapered and woven 3D designs, handling multiple ... academy.learnyourcnc.com |


